
When I rejoined scouting as an adult I purchased my first tent, a four person job from a camping and caravan shop...hardly used, in 2007 I won a tent in a Scouting centenary competition which had a low hydrostatic head rating which I sold and got a smaller two man tent in it's place. These are the tents that I've used up to date and since I linked up at the time of purchase as a course assistant with Woodlife Trails I've had a clear focus re kit and therefore I've been looking to reprise my outdoor accommodation. I've pretty much used a DD tarp and hammock setup whilst helping on the courses but I wanted to get a lightweight one man tent so that I could alternate between tarp, hammock, tent and bivi bag depending on the season.


On one of the courses one of the guys had a Mini Peak II from Backpackinglight which I'd seen in their Bushcraft and Survival Skills magazine adverts. I was impressed with it's 'vital statistics' and the website Christmas camping write up so decided to investigate further. In the end I decided to plump for the Sil Mini Peak instead of the Mini Peak II which I'd seen as it had a 2000 hydrostatic head rating instead of 1500.


This turned out to be a discontinued line so the natural choice was the new and comparable Sil Hex Peak which you can see in and out of it's box compared in size to a DD 3m x 3m tarp. Also featured are the instructions which cover the absolute basics but that's about it.


I was immediately impressed with the stuff sack that the tent comes in. It was, naturally, wrapped up all cosy and snug but as you can see the sack is not the usual tight fit and makes putting the tent away less of a chore than a sack that is only mathematically a bit bigger than the tent going back in (I'm not the only one who finds that am I?).


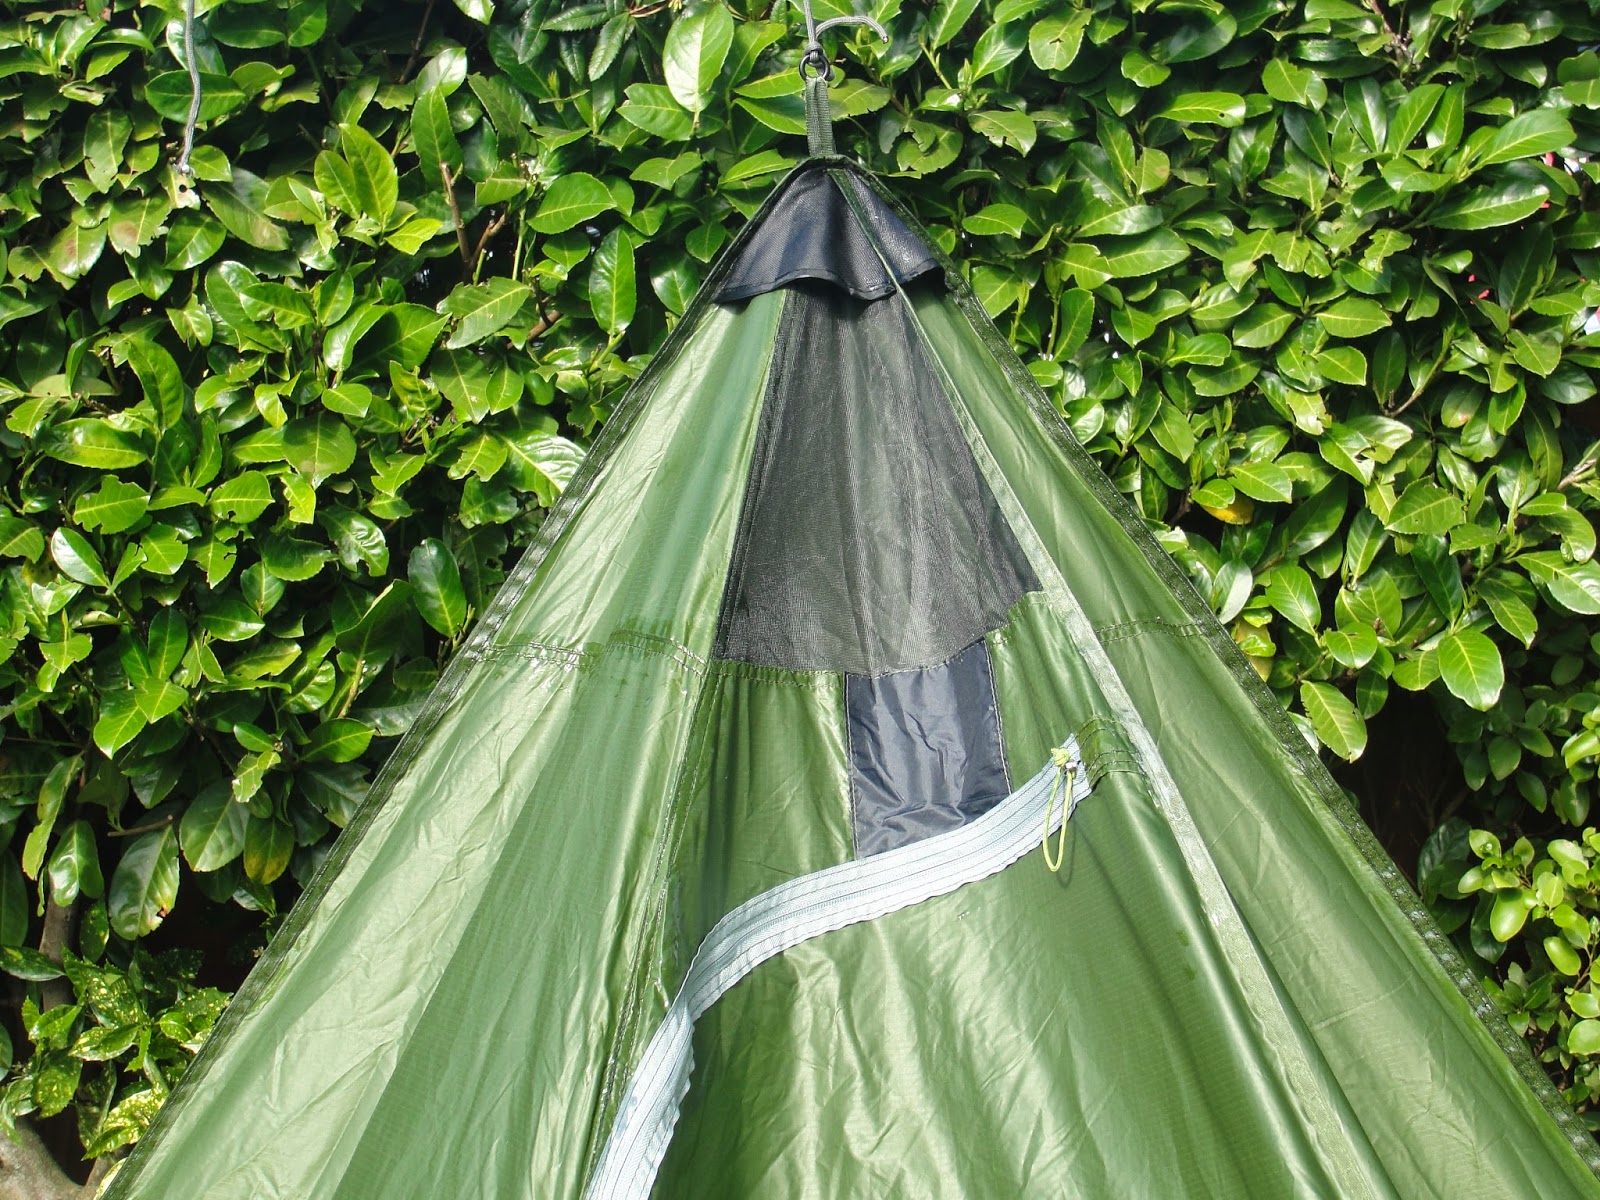
One small thing when I took it out and opened it up, I nearly stuck the ventilation support up my nose! It wasn't the end of the world but will be mindful of it. To start putting the tent up it needs laying out flat and it is an easy tent to do so. The above shot shows where it peaks up in the middle once laid out.


It can be used with walking poles as the support (but you'll probably need to purchase a pole extender) but seeing as I don't have at this time I purchased the adjusting tent pole instead. It comes with a choice of a flat end piece or one with a small spike on. I've plumped for the latter as a) It's already fitted b) I didn't want to faff about re-knotting the flatter one on and c) It digs into the ground nicely and I've fashioned a small, flat rectangular piece of wood with a small hole in as a 'foot' for it which now lives in the bag and is used/ needed most times in soft conditions.


The only thing I was a little concerned with was a small brown mark on the sliding ring which locks the extendable part of the pole (to the left in the picture above), I wasn't sure if it was a little bit of corrosion but it's something I can deal with if it is. Also shown above is one of the pegs which are purple...The colour reminds me of the 'small torch incorporated into a clipped key ring novelty by the tills' type stuff you get in Go Outdoors. As I'll be using the tent mainly in woodland I'll have to see if these are long enough to get purchase through the leaf litter. Also shown is the seam sealant which is supplied with the tent. I opted to purchase the separate Sil Net tube as I was advised it was superior but more on that later.


As I said earlier the instructions are OK if basic and I initially had a job getting my head around which pegs to push in to start the tent off so I used a marker pen on the instructions and freezer tags on the four relevant peg positions. The other shot shows the sturdy cup that the pole locates into, this is where the plastic loop is to hang the inner from but I've not managed to trap it even though I've had the tent up several times.


The inner is fairly easy to put up but I soon worked out that the outer pegs should only be a few inches from the tent because the inner loops also fit over them so if they are too far the inner protrudes. The peg arrangement and set up of the inner is a bit baffling. I'd rather have had some sort of internal fastening system, and maybe some clips half way up to help secure the netting a little flusher to the outer as it billows a little if you aren't careful. So far I've put up the tent, then the inner but I guess the loop I have my finger round is to secure the inner to the pole?

When it came to proofing I decided to hang and erect the tent inside out to make the seams easy to get at. The tube of Sil Net sealant didn't look massive so I decided to work from the sleeping area half of the tent towards the door. I ran out with one seam to go so I just finished it off with the smaller tube supplied. I think the purchase of the extra tube was a wise investment as I would probably have come up short with just one (perhaps I've put it on too thickly). The extra one feels superior too (whereas the supplied one felt more like Airfix model glue) and suggests 3-6 hours to go off...I'd recommend allowing six because I did it in Spring sunshine with a breeze and it took that long. The 'Airfix' glue sealant goes off within a few seconds of application.


As I mentioned that I'd hung it up to proof the seams, this is a shot of the hanging loop which, like the cup for locating the pole inside, feels sturdy and well made. The shot on the left is of the door loop to fold it back open.


The vent is located over the door and the support which I nearly thrust up my nose holds it open well. The porch area is spacious and has more than enough room to stash a 100 litre rucksack and more.


One the first attempt at putting it up I found that it wasn't that taut and I found the two tension straps in the stuff sack. I'd overlooked them on the instructions and they locate near the same four peg fastenings so aid the initial ID for pegging the tent out. I must be mindful when I pack the tent as they have got a little tangled up on a couple of occasions. Worringly the pole had had also slipped a little too and I put it down to me being a newbie with it...


The sleeping area is just about fine for me at about 5' 11'' and the website that up to 6' 2" is probably about the maximum but at a push I'd say. The inner seams need sealing too and I've used the 'Airfix glue' for that. As you can see from the position of my small digital camera that the space isn't too bad at all for a compact tent but the web blurb suggests a small child could possibly fit in too. Not sure about that as it would be cosy. The only issue I had was getting the inner away from the outer because the way the inner sits means that it can touch the outer if you aren't careful. I followed this up and was advised that the outer should be set so that it doesn't touch the ground (ie leave a small gap). I want it for use in the winter and going forward this has the potential to let annoying and cold wind under the edge of the tent.


The door is fastenable on the left hand side but there is no fixing for the right hand side. which to me is a bit of a design oversight as it would be perfect to sleep with it as a tarp style open tent and help with condensation. I can hook the peg fixing over the fixing on the corner, it just doesn't look symmetrical. So, having got to grips with it in my garden it's out to the woods for some proper outdoorsy pictures. I'd discovered that once the initial four pegs go in that it's worth opening the door and standing in the hole to locate the pole as you have to push past less fabric to see the locator cup (by the way the zip is a double one which you run to the top to open the door, and all the way down to shut it.).

And here I am next to a fully taught tent to give you another size comparison. You can sit up and there is a decent amount of storage space (in the front half) and it takes but minutes to pitch and strike up once you've got the hang of it. A handsome and spacious tent for sure.


Whilst out and about I tried pitching it without a pole to see how it was. Firstly I had to keep remembering that there was a hefty hornbeam bough just above my head. I tried to suspend it with a little slack, with the view to putting all the pegs in and then tightening it but I found that it kept wandering off centre so went back the initial four pegs. I might also consider adding an elastic tent peg loop with a larks head to the top loop in case I used this suspension method and the wind got up wobbling the bough. I attached a length of paracord 550 using an anchor bend which is essentially a round turn and two half hitches but the first half hitch is secured through the round turns, and I used a tarp taut hitch to secure it to the bough. I used approximately four feet of paracord which I guesstimate is this long enough for most eventualities.

I first tried this tent on a night that dropped to about six degrees and went from dry to rainy. Condensation inside is something to be aware of which brings me back to the fact that both sides of the door weren't manufactured to be fixed open, and I was very happy with it's wet weather capabilities (and feeling rather pleased with myself that I'd bothered to waterproof the outer and inner seams it has to be said). I'll be largely using it in a wooded environment so I don't envisage it having to repel rain that's coming in sideways. One issue that I will be watching is the pole, I'm not sure if I rolled over and knocked it but again it had slipped down a little and therefore made the tent outer a little saggy. I illuminated the tent in the dark with a small Scout shop mini lantern which did an adequate job.
Finally, the picture of the Skittles alludes to that fact that all good boys get sent a packet with a (bigger?) order, nice touch as is the hand written note on the card and the follow up phone call to check all is well. At the end of the day we want our kit to arrive as advertised and quickly, but these personal touches are great to see, and delivery is courier service the next working day.
If the weather isn't going to be too cold I sometimes take just the outer with me. I'd also recommend longer pegs for woodland as they do have a habit of coming out in the leafy ground.

Front and rear view of the tent (minus the inner) on a Woodlife Trails tracker course.
Having had this tent a while I have come back to review my review and made some additions to it. I know that functionality comes over aesthetics but this is a handsome little tent that I feel is rather let down by a few niggly points despite the fact that the Sil Hex Peak's current model has been tweaked:
*Whilst it doesn't come with the tent I've had to add a rubber ring to the tent pole (a rubber castration ring as it goes) because it doesn't stay up tight during the night.
*The inner fixings having to be pushed under the tent to be secured on the outer pegs.

*The fact that you can't pitch the tent touching the ground or you may have issues with the inner touching it. The above picture is of the gap from the current Sil Hex Peak V4a model.
*You can't fix both doors open to both help with condensation and to have the option to sleep with a view.
*As stated above consider taking longer pegs for woodland.
If the tent was a couple of inches wider, the edges of the inner tent sloped inwards at 45 degrees, the doors both symmetrical, the peg arrangement reviewed and with fixings this would be the leader in it's field and the sides of this inner from DD Hammocks for their pyramidal tent alternative is what I mean. This all said a lot of folk like this model so yer pays yer money, yer takes yer choice...
And the final entry on this blog is to say that the outings it had could be counted on the fingers of one hand. To be fair it has mainly four and five star reviews on the website and has been tweaked (now the V4a as of this last sentence being typed) but it wasn't for me and I wish I'd known about the 'faults' beofre buying because I'd have looked elsewhere.
Very nice review. I just bought this tent too and would agree with everything you have said particularly the inner being attached to the fly. I had already begun with this modification when I read this. I had three repair kits from old Vango tents which included toggles and elastic. I will attach an elastic and toggle to the three back panel seams and a small loop of 3mm shock cord to the corresponding area on the inner's seams. The fly toggles match the position of the guy loops on the outside of the fly - so, when pegged out, will hopefully keep everything taught. Bob from Backpackinglight.co.uk suggests a higher pitch (138-140) and this does indeed make the inner much less baggy. Also, try extending the guys on the front of the pod by adding a 30cm length of shock cord with a loop on the end and pull this over the door pegs (2 and 3 on Luxe's instruction diagram). This will pull the inner into a better position away from the outer fly. To test the position, you can simply put a peg into the bottom loop of each corner of the pod before you tighten the guys and pull it up.
ReplyDeleteHi Trevor, That inner is a little frustrating isn't it? Also my review on the site is worthless as I tried to link to my blog review and they have set it to not upload such links :S I'd like to put some loops on the outer but it's something I've never done before so won't risk it. I'll have a play around with the other suggestions you've made-Thanks for posting them.
ReplyDeleteMy pleasure Austin. I would also like to add guy loops to the outer in the centre of each of the 5 panels. However, even though I am reasonably good with a sewing machine, I would take this to a specialist as it would need reinforcing and sealing too. In my reply I mentioned peg out points 2 and 3. Of course that should have been 3 and 4. People have commented about continually having to get in and out of the tent to adjust the inner's guys. I have now added a length of 3mm shock cord to each of the pod's rear peg out points. Just replace the Dyneema guys with the same length shock cord. Once adjusted - tie it off. Now you can hook them over all the pegs from the inside. It works - I did this in torrential Lakeland rain and 40mph winds. Best of luck with your mods.
ReplyDelete