One of my favourite Ray Mears programme was the one he did from Belarus (back in the day when he did bushcraft shows). In it he sourced and prepared some ant pupae to eat.
I upended an olive tree from it's pot to replace some of the soil with fresh stuff, it soon became clear that I'd inadvertently tipped out a large ant nest at the same time. I watched the ants mobilise and soon they were taking the exposed pupae to a plan b secondary nest (a gap in the paving slabs). I decided to get my camera as well as a zebra billy can insert and, as Ray had, sample some. By the time I'd got back they had really got themselves sorted and there weren't many left, and even those that I put into the tray were being taken!
I had a measly five pupae plus one that was deposited under the shade of an old trowel that I found at the bottom of the pot (so that's where it went!) I'd upturned it to provide some shade near the gap in the slabs and I found a solitary one deposited in there. It was almost as if the ants had said 'That's all you are getting'.
After I cleaned them up and removed the last few ants I put them in some oil on a medium heat for 'a minute or two'. I may have done them a tad too long although Ray gets a real sizzle going with his which I avoided, as I did the sugar that he added. The taste I got was sort of similar to erm popcorn...not the shrimp that Ray and his sound man got, maybe due to being different types of ant?).
Talking of which, I had to remove an old flag stone and, almost predictably, there as a massive ants nest underneath. Whilst they set about moving the pupae I was a bit quicker off the mark than last time and got more of a sizable amount. It was noticeable how much smaller they were than the previous ones and this time, like Ray, I added some sugar. I still didn't get a full on shrimp flavour but there you go. This is the link to see the master at work here.
For the July/ August 2013 edition of Bushcraft and Survival Skills magazine I did a course review and opened it with the following; If I said to the male bushcrafters "Wife points" I dare say that there would be a lot of wry smiles, raised eyebrows and knowing nods.
For those who don't know what I'm on about it's the imaginary, yet very real, points that need to be gained by a chap (and I dare say females as well) to go on course, to shows and on extended rambles that the other half may not wish to. I'm alone in my household in wanting to read bushcraft magazines (I subscribe to both) and outdoor books, go on the afore mentioned courses and to shows. Whilst I do enjoy reading about folks who post on social media about a weekend they just took off on...I also wish to make a voodoo dolly of them! (only kidding).
Even though we all go out as a family on country walks the above picture is typical of the distance soon built up as I stop to examine a tree, wait for a bug to centre itself on a flower for a picture etc, so as you can see it's awkward.
I'm a househusband and work part time so the other consideration I have is that I'm loathe to just push off once my wife rolls through the door and say 'See you Sunday afternoon'. I'm also a parent and I'm a strong believer in quality family time and insist on getting the kids out in the country to break up the Xbox time and give their thumbs a rest...I can't do that if I'm out and about in a wood somewhere.
Also next year I will have been married a quarter of a century and whilst I've always been an outdoorsy person my wife didn't marry a hobbyist bushcrafter so I can't turn round and say 'You knew what you were marrying!' As well as studying the local flora and fauna (which will appear as a blog entry in due course), a fair proportion of my bushcraft time is back garden stuff whether that be practice or construction.
Last August Pablo asked me if I'd be interested in helping as a course assistant on Woodlife Trails course-naturally I said yes but did make it clear that wife points would come into play and indeed, I've reined in my Cub Scout weekend activities to accommodate this as it was too good an opportunity to turn down the chance to be with the extended WT family, even if my role is a 'marigold'.
SWMBO stands for (S)he who must be obeyed and I'm sure it is also equally relevant to substitute the word obeyed with outmanoeuvered but I sure as hell can't think of a way of fixing the wife points issue!
P.S. I'm not the only one who knows and understands the wife points merry go round...
Having decided to have a quick afternoon country walk (I'm as close to rurality as I am the town centre from my house) and I'm always scanning up down and side to side in an effort to make sure that I don't miss anything and maximise my walk, this does often have the effect of seeing me lag behind the rest of my family...This is a shot from a walk earlier in the day. Is it my fault I view the natural world like Neo from the Matrix?
The open eyed approach during the morning saw me capture some cracking shots, the best of which I've titled 'Damsel in Distress', and alertness saw the afternoon walk paid tasty dividends! Only a ten to fifteen minute walk from my house I chanced upon a quick and highly prized grazing opportunity, wild strawberries.
They were in a really sunny aspect and after the recent sun we'd been blessed with, had seconds to live.
I also found a huge specimen (my biggest to date) and as you can see against the others in the above picture, it's a contender. The small one at the bottom of the picture is about the same size as those in the first strawberries-in-hand pic.
Using Jedi like control my wife and I left some but it made me think about how folk walk around with their eyes shut. These jewels were there for the eating and yet no one else had, and yet they stoos out like sore thumbs to me...Everyone else's loss. The other fruit that people seem to overlook is the raspberry as I'm sure they are viewed with a glimpse as an 'un-ripe blackberry'. I'm going to do a future blog page on the differences between blackberries and raspberries as soon as I have the photos available. Look and make the most of the countryside if you don 't already!
There's still a good amount of elderflower to be had so with such a small window of opportunity it's worth making the most of it. I'd suggest that cordial is the best known use for the fragrant flowers, but before they all go consider the following.
The first one is elderflower syrup. With a similar process to make silver birch sap syrup it's just a case of slowly reducing elderflower cordial.
Elderflower syrup
You may find that your hob has a super small burner to achieve this but I find that it gets a slightly burnt taste even on the lowest of the low on mine. I've found the answer in my impromptu jerky maker. Initially warm the cordial on the hob on a low setting, up to the bubble stage but absolutely no further. Once this is done, remove the pot from the impromptu jerky maker and place the warmed mixture in it. It actually doesn't take that long (often a few minutes).
It takes on the same texture as golden syrup and it is absolutely fantastic on puddings such as vanilla ice cream when cooled.
Perhaps elderflower fritters are the next best known thing to make after cordial...There are many variations on the tempura style batter out there but this one is simple and fairly bombproof.
Gather your elderflower heads, preferably on a sunny day. Shake them gently to release the elderflower scented bugs. Break them into fritter sized florets...It's up to you what size they are. I've seen some recipes that suggest pulling off a long section of branch to act as a handle to pull the fritters out of the oil. Rather brutish towards the tree for my money.
As well as the elderflowers, the ingredients needed are: Really chilled carbonated water, , one egg (about one mug full), plain flour (about three quarters of a mug full), mild tasting oil for frying and a small plate of icing sugar (optional). Pour the oil into a small saucepan (it only needs to be deep enough to cover the flowers which go in upside down).
Mix the egg and carbonated water together and beat briskly until well mixed. Add the flour and mix until it's all combined and it should still look fairly watery. Put the light under the oil about now...and stay with it! Holding the stalk dip the heads in until well coated.
Do take care from hereon in, hot oil and fried products alert!
Drop a small blob of batter into the oil to test that it's hot enough, if it gets a bubbly reception you can start on the real thing. It only takes a minute or two to be done so do check it. Using kitchen tongs, take it out when it's crispy but not brown and then straight onto absorbent kitchen roll. Dipping it in icing sugar at this stage is optional for the sweet of tooth.
Dab the fritters gently and remove the crusty bits from the oil every now and then or they do have a habit of levitating onto subsequent fritters. These scraps remind me of Wednesday lunchtimes in town at senior school in Skegness when my dinner was chips, frying scraps and gravy, and all for 15p...But I digress. When they come out one extra thing you can do is to lightly dip them in icing sugar if you have a sweet tooth, or like me you find the fritters a little overrated/ underwhelming.
The finished product on the chinzy material. and onto the cleaning to keep the other half happy. Elderflower Turkish delight
Measure out 350-400ml of home made cordial and in a seperate bowl start a packet of gelatine sheets soaking in a small amount of cold water (this was a 25g pack). Pour yourself a glass of cordial and quaff whilst waiting the five or so minutes the gelatine sheets need to turn to a gloop.
Gently squeeze the gelatine to remove any excess water and add to a saucepan, followed by the cordial. If you make Turkish delight with just a flavouring you'll need to add sugar but as the cordial has plenty there's no need. Place on a low light and warm gently for a few minutes until it's an opaque blended liquid. Lightly grease a piece of parchment paper lined bowl with a neutral tasting oil-vegetable in this case.
Skim off any scum from the liquid before carefully pouring into the lined bowl. Leave for a few hours or overnight to set. Start cutting the block into small pieces whilst smelling it close up every now and then and going 'Mmm'. I'd suggest trimming the rough edges off first and scoffing them yourself. No one needs to know.
Tip the cubes into a bowl of cornflour and icing sugar in a ratio of about 3:1 (icing sugar alone will just turn invisible and sticky on it's own). Make sure they are coated and repeat if necessary if any look to have areas that are missed.
Take outside and do a posy shot with the sun shining through one, then turn round and look at the mess you've then got to clear up...Again. I reckon the syrup and delight would work well with this cordial too...
I do rather like paracord knitting and I've been lucky enough to do some articles for Scouting, Bushcraft and Bushcraft and Survival Skills magazines on the subject. I know that the latter one prompted a well known outdoor shop to stock paracord due to the increase in enquiries they received so I'm not the only one...Some of the images used are ones I did for the said business.
Working with paracord can be very satisfying and I must say that I take no responsibility if you read this blog page and get a craving to 'knit 550'. 550 refers to the tensile strength of 550 pounds that this cordage has, if I recall correctly the 7 inner strands are 50 pounds each and the outer sheath 200 pounds but don't quote me on it.
In the past when I did paracord stuff with the Cubs I could show them then go '5, 4, 3, 2,1' in my head to the moment when I hear 'What do you do again?', 'I didn't see', 'I can't do it' and so on. I think folk get baffled because you are tying what looks like a complicated knot around some cordage but essentially you are only tying a simple overhand knot (the one that secures a conker on a string) around two straight lengths of cordage. There is further tying explanation further on. These bracelets and so on will give you a lot of workable cordage when pulled apart and the outer core and inner strands are used. Some of these are a genuine outdoorsman's friend, others are offspins with something more of a novelty value.
I've also used several links from the animated knots website to help with the knot tying in this blog page. Your basic pieces of kit to make anything are the paracord, sharp scissors and a lighter for sealing the ends, this is explained further on. Please be careful when using lighters and melting paracord. The metal parts of the lighter can get hot and burn (along with the flame obviously) and the paracord is made of nylon and can also leave a nasty burn if it gets on the skin when heated. Use push button lighters as the manual ones really hurt your thumb after a while.
Basic paracord bracelet.
Measure a loop of paracord around your wrist and secure with an overhand knot (to make an overhand loop). Make sure you can get a couple of fingers within the loop when on your wrist as the internal circumference will reduce slightly as you weave more paracord onto it. Cut the length of paracord to weave around the wrist loop allowing 1 foot for every wrist loop inch (about 30 cms to 2.5 cms in new money) plus a little over. Better to be over than under as it's cheap as chips and you may end up desperately trying to pull short ends through the weave with thin pliers to complete! Worth knowing but equally worth having a pair to hand.
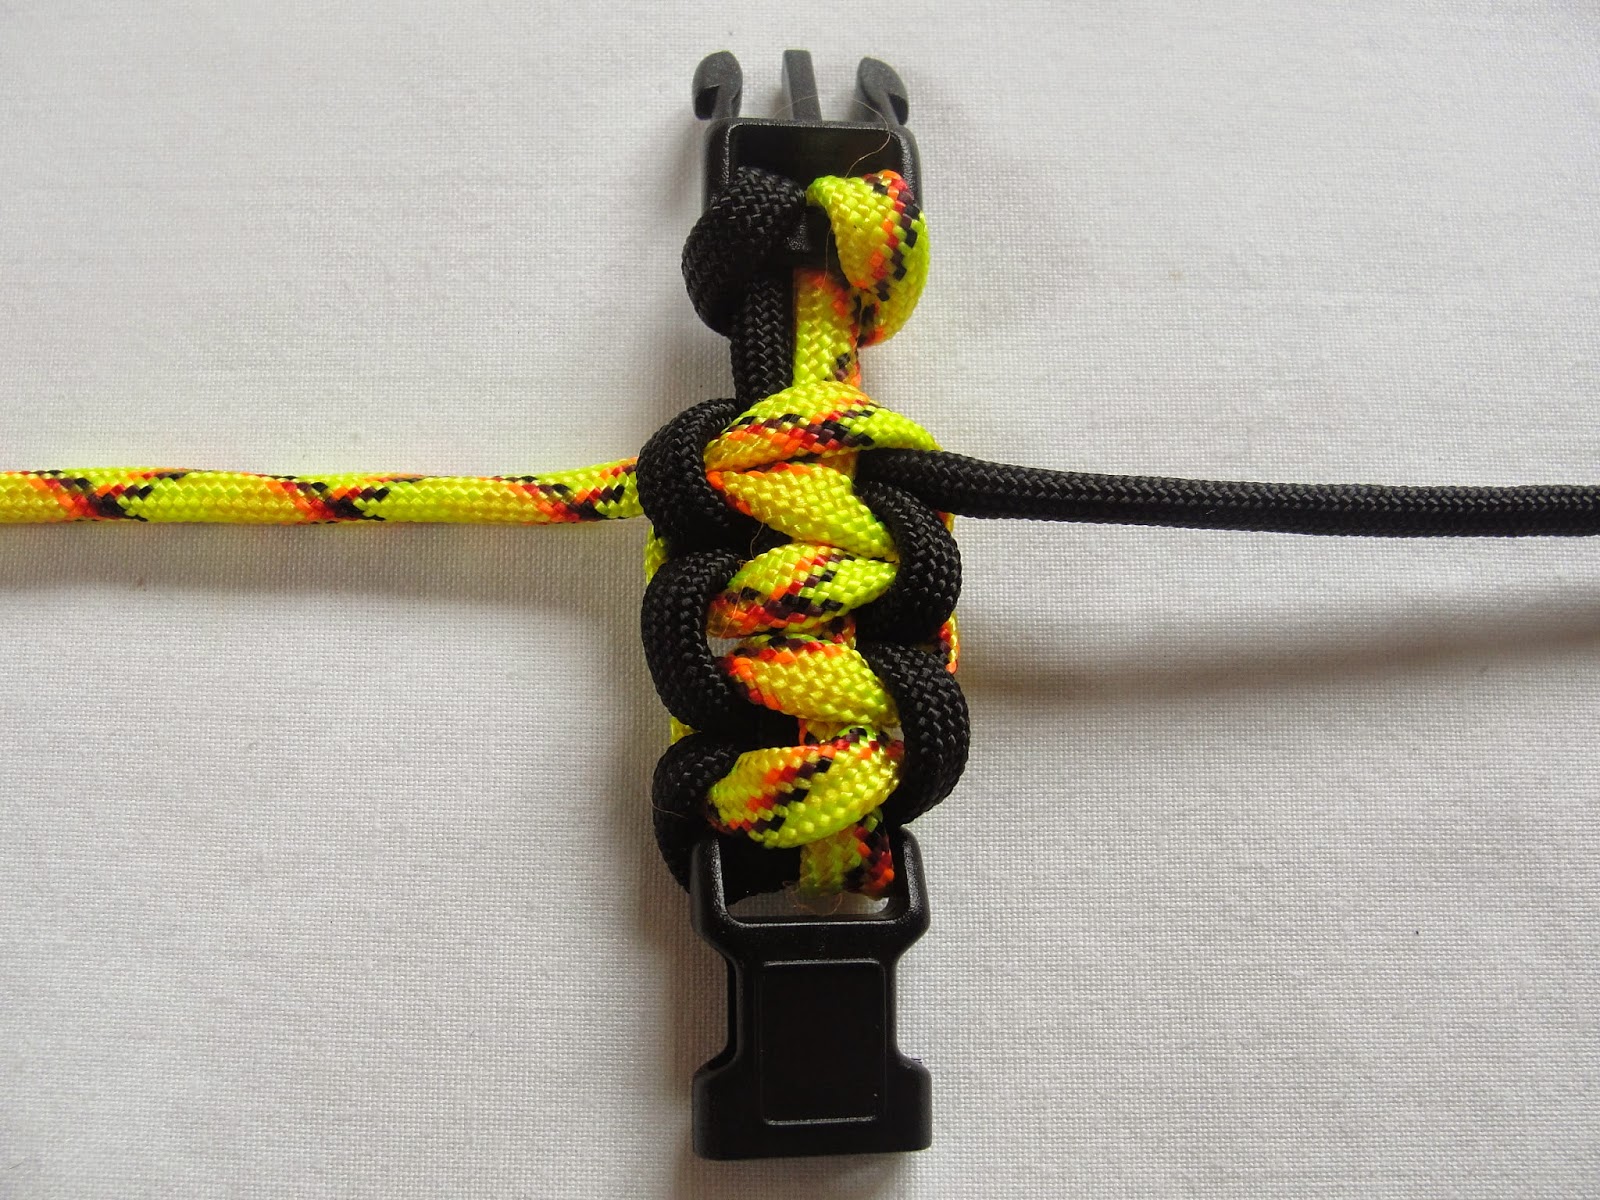
You can start from either side and in this example it's started from the top. Find the middle of the chord and line it up with the wrist loop. Fold the top orange length over the wrist loop as shown about half an inch from the left hand side of the olive wrist loop.
Now take the lower orange length and place it over the top of the upper length as shown.
Now take the lower orange length and run it underneath the olive green bracelet loop and out the side, this is called the cobra weave but if you analyse the knot itself without the olive green loop in place you have simply tied an overhand knot. take this opportunity to check that the knot on the wrist loop will snugly fit through the end loop.
It is now a case of repeating this process alternatively from both sides so we start with the lower length this time being placed over the olive green wrist loop.
Place the upper orange length over the lower one.
Take the upper orange length, run it under the olive green loop and out the other side. stop and check that the knot will fit snugly through the loop at this stage and re-adjust if not.
Once done, gently shuffle the knots together and and re-tighten if necessary. The idea is that this bracelet is giving you a lot of cordage stored in a small area so the more cobra weave that can be done on the wrist loop the better.
Repeat until it is impossible to squeeze any more cobra weave onto the olive green wrist loop...
Place the overhand knot through the loop to wear it. How to finish and seal.
Paracord needs to have the ends sealed (whether they it is made into something or not) as the ends of the outer sheath will fray and the inner strands can pull out. There is more than one way but I use a lighter to simply melt the end of the paracord gently, ideally without the flame touching the end. Once the end appears to melt quickly use the body of the lighter to gently squash the end and form it into a neat rivet like end, this is especially important as a slightly squashed end will help secure it in a bracelet etc and stop it unraveling easily. You can also do the last two or three cobra weave turns slightly loose and use thin pliers to pull the remaining length back through the weave on the inside. This hides the rivet like seal inside the bracelet but it's a pain to do!
As previously stated, please be careful when using lighters and melting paracord. The metal parts of the lighter can get hot and burn (along with the flame-obviously) and the paracord is made of nylon and can also leave a nasty burn if it gets on the skin when heated. Use push button lighters as the manual ones really hurt your thumb after a while.
Clipped paracord bracelet.
For this type of bracelet you will need to know how to tie a Larks Head (there is a hot link to help with tying further on).
A clipped bracelet still uses the cobra weave but instead of using a large knot and loop to secure it you use made for purpose clips (which are more secure). It is roughly the same length of paracord needed as a basic clipped one but instead of two pieces the length that forms the overhand loop that goes around your wrist is now part of one continuous length which enhances the overall length of cordage available to the wearer.
Once the length of paracord is measured find the middle, double it up and feed the loop through one part of the clip (the 'female' part in the picture above). Tie a Larks head (cow hitch) and then thread the two ends through the other part of the clip (the 'male' part).
As with the basic paracord bracelet start the cobra weave off...
Once you've done a small amount of weaving check that it will still clip around your wrist comfortably and adjust if needs be.
Pull tight, cut the remaining paracord and seal it neatly with a lighter like the previous bracelet.
Making a bracelet during some Frontier Bushcraft course down time.
Multi colour paracord.
Some paracord bits and pieces can be made with more than one colour and one way of achieving this is to fuse two pieces together. As per sealing the ends, melt the end of two pieces close together with indirect heat and then quickly put the lighter down (on a surface that won't scorch) and gently and carefully press the two ends together. If you press too hard the ends will bulge but any bulged bits are often possible to snip off when cooled.
On a simple looped bracelet the colour you cross over first will be the central, dominant one and other will form a line down both sides of the weave.
Clipped bracelets are similar but please note that getting a paracord seal through a clip can be hard, it may be worth pushing the two individual lengths through and then sealing them afterwards. You need to line up the seal as shown above to face the inside of the bracelet so it can't be seen.
The same rule applies to how the coloured paracord will lie. You can also use this method to introduce a third colour between the two parts of the clip and then weave a two colour length onto it (like a simple looped bracelet but with clips). Whichever bracelet you make do check that the heat sealed ends are well secured.
As previously stated, please be careful when using lighters and melting paracord. The metal parts of the lighter can get hot and burn (along with the flame-obviously) and the paracord is made of nylon and can also leave a nasty burn if it gets on the skin when heated. Use push button lighters as the manual ones really hurt your thumb after a while.
Paracord keyring.
For this you will need some sort of fastenable clip or metal split ring. Again the cobra weave is used to form the key ring body and as it's an inch for every foot used you'll need the required length of the key ring, the cobra weave plus a little over for the knot.
The knot to start a key ring off is easy. It is easier if you add a split ring into the loop before you tie it as shown. To make this knot easy form up the rhs of it as per the picture above left and you are basically mirroring this half to finish it. Excuse the rather phallic appearance of the pre tightened knot! How much paracord to make the knot? Roughly 4-6 inches depending how tight you pull it of course.
As well as robust key ring fobs this weave makes very durable (and potentially useful) zip pulls on rucksacks. Handy if you have cold hands. If you fasten a split ring with a Lark's head knot where the clip is, and secure the top knot around another split ring and weave it becomes what is known as a soloman bar (there is a green example in the very last picture on this page, well the left hand side one), As with the others, cut the waste and seal. Two small key rings linked end to end yin and yang style with a lark's head can be used to make the next thing...
Paracord woggle.
These are arguably the fiddliest paracord project to do so far, at least initially. Using a stick about the diameter of a broom handle (or use a broom handle!), this project will need something like a 54 inch piece.
Find the middle of the paracord, form another lark's head like you did with the clipped bracelet around the wood. Carefully tension the paracord so that it's firm but not tight around the wood...
Now start to form a reef knot loop as with the key ring. This is the slightly fiddly part because it needs tying whilst on the wood...
Once completed it can be gently slid off the wood which makes the subsequent cobra weaving a whole lot easier. Continue to do the weave...
As with all the previous weaves, neatly cut and seal the finished woggle off. The above rhs picture is what 30 odd lengths of 54" paracord with the lark's head and first cobra weave turn in looks like. Once you've finished it off wear it with the final bit of the weave at the back.
As mentioned earlier, if you attach two key ring weaves to each other yin and yang style and then cobra weave up each one you'll make a two coloured woggle. Am I going on record with what I think is the ideal internal diameter of a woggle? Not likely!
Elastic hair band alternative.
As an alternative it is possible to make a bracelet or woggle using an elasticated hairband. Simply subsititute the loop that goes through the middle for the hairband. The bracelet at the top has a blue and a white one running through the middle.
Basic weave variations.
In the above picture from left to right. A buckled bracelet (made small for the picture) which shows the set up for a standard clipped bracelet but then the paracord is run back through the first buckle again to add extra usable length to the bracelet.
The bracelets can look a bit chunky on smaller wrists but can thin down a bracelet by either gutting the inner strands and/ or lining the paracord lengths on top of each other instead of side-by-side. Stripping the paracord will of course reduce the usable length of the bracelet. There are a vast range of beads, buckles, clasps and bolt ons to be had when making paracord stuff, this compass is just one such item. It has a slot underneath and you weave up to the compass, pass the ends through the slot and continue weaving.
This picture shows a few alternative cobra weave materials, raffia with African beads, beachcombed fishing line and leather.
You may notice a peach coloured thread running through the fishing line bracelet, this can be achieved with paracord too. Simply measure and cut a piece which is about four inches longer than the area the cobra weave will sit on. have a couple of inches poking out each end. Start cobra weaving with the extra length within it but don't do the initial weave too tightly because you need to use a pair of thin pliers to pull the 2 inches through the loop and down the back (inside) of the weave. Tighten the cobra weave and then seal the end of the strip. Finishing is pretty much the same, leave the last bit of weave a little looser and poke the other 2 inch bit down the back, seal as before and then work the weave tight.
And after all this, consider using the weave for everything from thin straps on binoculars to a spare length on a the lifting loop of a rucksack. Believe me, if you have a strap like a cheese wire on any binoculars you own, this will make a great difference to their comfort. It also make great bootlaces too.
'Dropped stitch' cobra weave alternative.
Start with standard cobra weave 'stitch' but then no! No more standard stitch!
Do a dropped stitch by passing the paracord over then under the strap paracord loop and then finish as per the usual weave. Repeat left and right.
Personally think it works better with contrasting colours to show off this handsome weave.These are one of my favourite combinations.
Paracord people.
These little people are an easy variation on the cobra weave and make a fun key ring. Form a small overhand loop or Chinese button knot...more on these later) in the middle of a piece of paracord about five inches long, insert a split ring if it is to become a key ring. Tie an overhand loop at the end of both lengths, this forms the head and legs. You'll see that 2 inches of weave will give him slightly small legs, I used a spare piece that was 27" long with 4" of waste.
Start from the top of the leg and do the cobra weave up to the neck. Don't cut the excess off at this stage.
You need the excess to form the arms and hands. Tie an overhand knot in each piece of excess until you have the desired (and equal) arm lengths sorted. Cut and seal.
If you use fairly two close colours it's possible to use the heat sealing technique to add different coloured legs, the seal is hidden in the weave which needs to be tight to help hide the joints.
Super Cobra weave.
As if a repeating overhand knot hasn't got a macho enough name, along comes the super cobra...essentially a second layer of cobra weave paracord over the first one, either using the same bit (allow more for the weave as it is going around a thicker base i.e. the weave as opposed to two pieces of paracord). or a new piece of a different colour. The former gives you longer usable lengths than the latter of course...It makes whatever you are making a thicker and weightier but remember that it will decrease the internal diameter of a bracelet or woggle even more than a single weave so bear this in mind when doing your measurements.
This key ring (the making of which is covered earlier on) uses the super cobra weave with the paracord in two parts. This particular key ring is three inches long.
Once the knot is tied to make the length in the orange paracord around which the weave goes, insert a length of paracord through the knot as shown (in this case yellow). Once done start weaving the orange lengths.
Trim up and seal the orange paracord when finished and then start weaving the other inserted yellow length up the key ring body. Cut and seal the ends when complete.
A shot of a 'how to' I did for a shop
Chinese button knot.
This is a rather impressive knot that you can use to make a superior paracord bracelet and heads for the paracord people. It looks complicated but because it's a symmetrical knot there are several repeated moves. I've put letters on some of the key parts and the knot itself will take approximately 12-15 inches of paracord. There's also a brief video below too.
Loop a length over your index finger and then put a loop in the left hand length as shown. Make sure it is the way it is shown and not the other way around.
Take the loop and bend it around to meet the left hand length (A). It bends round anti-clockwise, as opposed to being bent over like a springing mousetrap. Secure the loop with your left hand thumb.
Gently ease the length A over your left hand thumb and then grab the lower left hand length (B) and feed it under the right hand length (C).
Push B underneath A and straighten the knot out so that it is symmetrical. It should resemble a number eight in shape with a diamond shape in the centre (D). The letter R represents the 'ring' formed around your finger.
This is the reverse of the knot to show the 'ring' (R) more clearly. Take length C anticlockwise, past R, under the knot and poke it upwards through D. Gently pull it to take up the slack.
Nearly there! As I previously mentioned the symmetric nature of this knot is your friend. I pull the knot off my finger, turn it through 180 degrees and slip it back on my finger to repeat the previous step but this time length B goes anticlockwise, past R and underneath the knot into D
Now if it's not gone quite right, it happens...If you have got it right, you can spend a brief moment feeling a bit smug that you've done it before gently pulling the paracord in the knot to tighten and position it, this can take a while. It can also be a useful knot for tying in tool cordage such as this Bahco Laplander saw, my Scout woodbadge has one and I have some as a fat stopper knot on my hammock whoopie slings to stop the loop accidentally pulling through. Credit to Adrian Rose for the latter suggestion.
Paracord jig.
All bracelets are doable by hand but they are a little easier if a jig is used. They are easy to make and can be as simple or complicated as you like; anything from a branch stump on a tree to a jig that can be angled with a seat. The one below is the one I usually use.
Clockwise from top left: The jig, this is made of scraps of wood from my garage and an old wood pallet. The fixing points have the two sizes of clips I'm ever likely to use attached to some folded settee leather and held in place with a movable bolt. You can also see the start of the 'ruler' on the left hand side to measure the bracelet size. The bolt itself is what I use to do a simple looped paracord bracelet over. The underneath showing the washer that holds the moveable blocks in place, not the necessary blocks that the jig sits on the lift the washer and bolt head clear of the surface that it is placed on.
Paracord wallet 'chain'
Start by selecting and cutting a suitable piece of paracord, more on the measurements later on but you will need to allow two lots of seven inch lengths to tie two knots (in this case I will be using anchor bends) plus an extra inch or two for trimming.
Gently pull the inner strands out a little and select one to tie a piece of wire to (the same length as the piece you have cut). Cut off a small section from the other end to re-locate the strands.
Now comes the slightly fiddly bit. Gently tug the inner strands one by one until you see the wire move the other end (make sure the wire is flattened) and then gently start to pull it through. Be mindful that all the other strands don't follow as they'll bung it up.
Snip the wire almost flush with the paracord and bend over the end and seal. If you pull too hard or the wire isn't flush it can pierce the outer core and get stuck. If it does, gently push it back and squash the paracord in your fingers.
This is where the anchor bends come in. It is pretty much a round turn and two half hitches but the end is passed between the round turns and whatever you are tying the knot around which makes for a secure knot in my humble but important opinion :) Seal it with a slightly larger waste bit and gently squash it until it is a large rivet shape.
The measurement between knotted clips is obviously up to the individual wearer but this example is for an adult (me) and is approximately 20 inches. A more bushcrafty application could be to secure your car keys when out and about in the woods or on a course. The little black paracord figure is also similarly wired and therefore poseable.
I have used one and it feels secure but it goes without saying that it isn't the same as a chain one and you use it at your own risk.
And finally, a roundup of fire, nano and microcord.
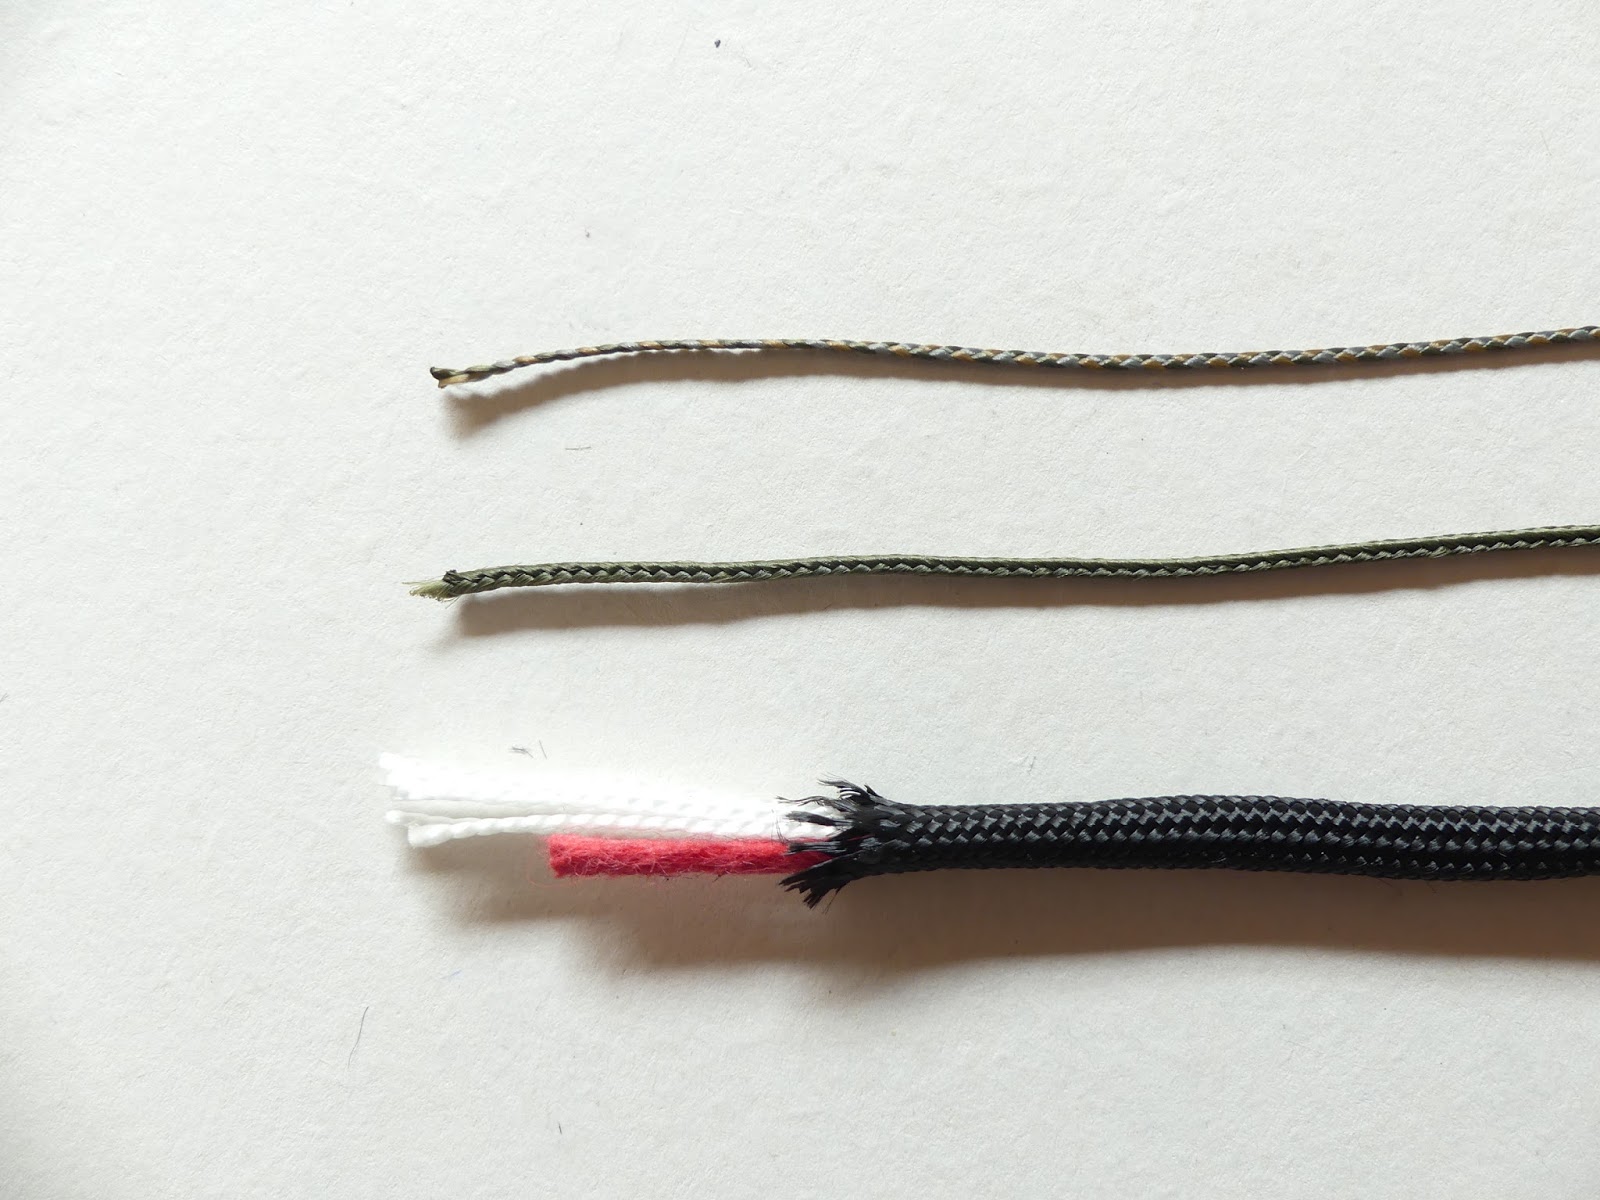
First I'll cover firecord, which is the true paracord out of the three of them. It is 550 stuff with all the inner strands but it also contains a contrasting red strip of a lighting medium called Livefire. It is moderately easy to buff up into a lightable bundle using either a ferro rod scraper or a knife.
Once buffed a ferro rod is used to well, totally obliterate the firecord...It is there under the sparks I promise you!
It was fairly easy to light and burns well on it's own, or with the paracord itself, but if you've done any paracord knitting before this point of the blog you'll know it's smelly stuff when it lights.
Livefire is supposed to be totally waterproof and I decided to try this out too. I left a piece sitting in a tumbler of water and it sank which I didn't expect for a waterproof product. I squeezed the length through finger and thumb and again, buffed it like the dry test.
It did light but burnt with a smaller weaker flame than the dry example. The firecord does work, is handy and can be hung from a rucksack etc, but my choice would be a couple of pieces of Hammaro fire lighter which works in wet conditions and can be secreted in a pocket or rucksack pouch and doesn't create the noxious smoke that burning nylon paracord does.
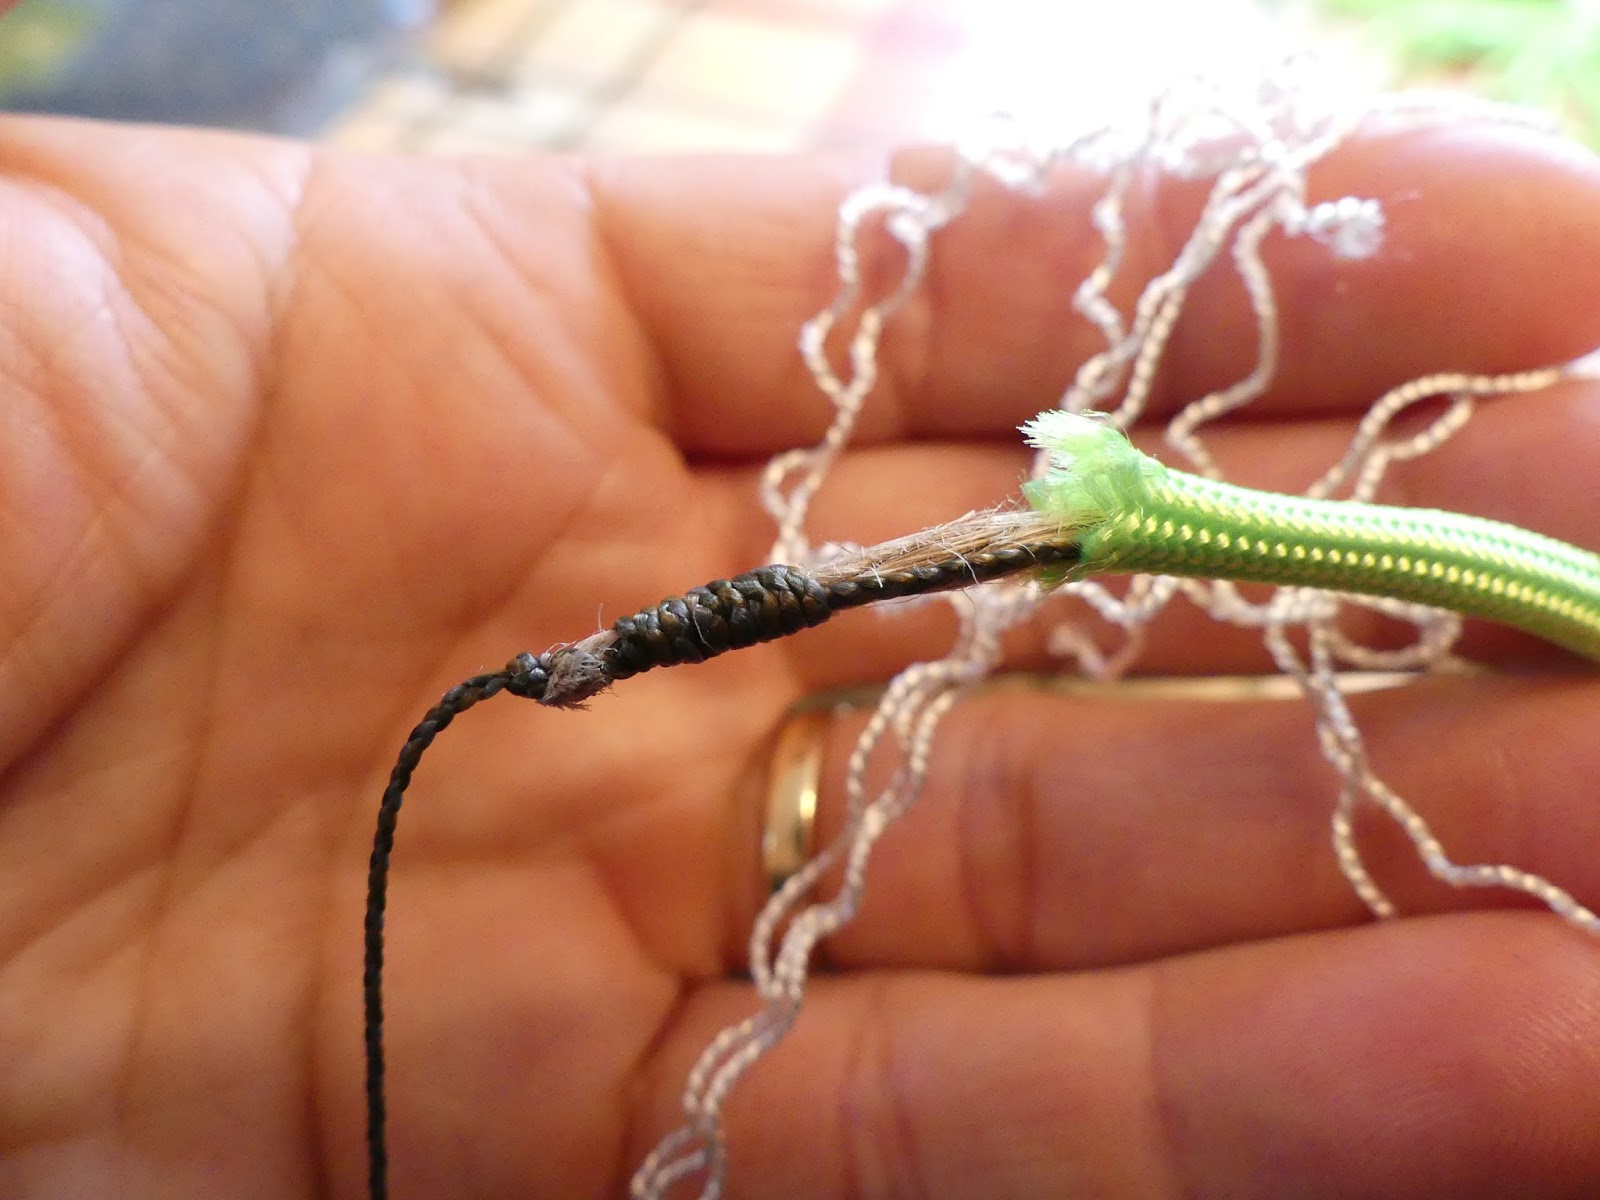
I tried making my own version by removing some inner strands and then threading some natural jute string (which takes a spark well) using a similar technique to the wallet strap from earlier and it is possible but I found that it made the inner strands bunch up and often come out. Firecord is more expensive than regular 550 cord but equally you don't need much so I'd suggest the DIY route would be good for just practicing pulling stuff through the outer core really.
Next on the list is nanocord which isn't paracord 550 in the true sense. It is also nylon but it has no internal strands, has just short of 40 pounds breaking strain, and is around 0.75 mm thick (the above picture has some regular paracord in it for comparison). I have still included it because it can still be utilised into a decent amount of cordage when made into a bracelet (or similar) using the cobra weave, it is worth pointing out that it is a bit fiddly to use like this and would benefit from being anchored.
You'll need just over 10 inches for every inch weaved (assuming it's round a loop of nanocord). I used some of this to pull the jute string through the above project and you can see it is pretty much the same diameter as the fire cord inner strands. As well as bracelets it could also be used to whip rope ends and as an all purpose length of cordage that doesn't have the bulk of paracord 550. I used some of this to pull the jute string through the above project and you can see it is pretty much the same diameter as the fire cord inner strands with slightly less breaking strain.
Finally we have nanocord's big brother microcord which again isn't paracord 550 and is similar in all ways to nanocord except it is 1.12 mm thick and has a breaking strain of 100 lb which is a good trade off against paracord 550 in terms of size. Again it's multi use so is included because of this fact. It is less fiddly to weave than nanocord but again would benefit from being anchored. You'll get around 10 inches of weave per inch and isn't a million miles away from nanocord in that respect.
This page has presented a fair amount of technique and guff, but equally has only scratched the surface. By and large it's concentrated on the cobra weave and versions thereof. If you look closely in the left hand side picture you'll notice a few different weaves (here's one of the slightly different bracelet design weaves that I put on a Scouting forum) but I could have gone on forever. They are in there to just show that there's as many different weaves and styles out there that you have time to hunt down and do. Predictably Youtube is your friend, try looking up the likes of Stormdrane and TIAT. Please take any dimensions, breaking strains etc as representative and do some research if using anything to secure valuables and bear load etc.
And I take this Korean blogger swiping literally the whole page content with a small mention at the end as a compliment. Have a look here at my fire, nano and microcord. Now for the cheesy bit where I type "Have fun"!