Over the years I've had several different bushcraft experiences with the Scout Association; I helped Bushcraft and Survival Skills magazine's base at Gilwell 24 to cover Bear Grylls' investiture as Chief Scout for an article (which appears in issue 22) and was one of the three founding Scouters who started the bushcraft base off at Gilwell 24 the following year (the others being a former Bearclaw bushcraft school instructor and the founder of Wood Sage). I've also done articles for Scouting magazine and the Cub supplement (when it existed) and I was a major contributor to The Outdoor Adventure Manual, not just in terms of articles but also 'recruiting' the majority of the guest instructors who contributed articles.
I got an email from a lady called Rachel, a member of the Commercial Partnership Department, based at Gilwell in early 2014 to tell me about a hush hush plan to link the Scout section's Survival Skills badge to a new sponsor, namely Victorinox. This would also tie in with a 2015 badge overhaul (including the Survival Skills badge criteria) and would I be interested in giving some input to this project concerning knife usage. I was flattered but suggested a handful of Scouters who would be able to deliver a more comprehensive information package than I...Whilst I know how to use a knife competently I felt honesty was the best policy with something as important as the two brands the information would be linked to so that's why I respectfully declined.
I got an email from a lady called Rachel, a member of the Commercial Partnership Department, based at Gilwell in early 2014 to tell me about a hush hush plan to link the Scout section's Survival Skills badge to a new sponsor, namely Victorinox. This would also tie in with a 2015 badge overhaul (including the Survival Skills badge criteria) and would I be interested in giving some input to this project concerning knife usage. I was flattered but suggested a handful of Scouters who would be able to deliver a more comprehensive information package than I...Whilst I know how to use a knife competently I felt honesty was the best policy with something as important as the two brands the information would be linked to so that's why I respectfully declined.
To my surprise Rachel emailed me back some time later and asked if I would be interested in coming to a meeting with her and the Victorinox team at their flagship shop on New Baker Street in London with the view to discussing some content for the Survival Skills badge. Unlike the knife usage request I accepted this invitation as I felt I could at least put some meat on the bones as a starting point. I was sent the revised badge requirements and set about brain storming them. I've placed a table of the old and the new requirements at the very end of this blog page if you are interested in seeing them.


I headed to London for a morning meeting in early September and made my way up to their meeting room on the third floor. As I was early I was offered a rather fine coffee and shown into the plush meeting room which gave me a chance to get myself prepared and have a cruise around the many cabinets filled with Victorinox products. I'd done some homework on the new badge content and in for a penny in for a pound, I'd knocked up an idea for an exclusive Scout Association knife but more on that later. Rachel arrived soon after and, along with a lady called Suzanne from Victorinox (their marketing manager), we started the meeting and yes I did get a second coffee!


The meeting was very productive and was a combination of two organisations talking turkey with me chipping in thoughts, suggestions and props in the appropriate places. Doing the content homework beforehand had really paid dividends because it showed that there was a lot of suitable Scout Association content available to use and if needed, Victorinox had a large catalogue of usable images too. Victorinox discussed calling the penknives pocket tools which I suggested wasn't necessary because a) everyone knows them as Swiss Army Knives (SAKs) and b) I felt that there was no need to no call a knife a different name (too much hysteria out there). I also introduced them to the phrase Everyday Carry (EDC) which of course refers to a blade that is legal to carry. So the bones of the package were in place.


We convened the meeting just before dinner with plenty of follow up work to be put in place. There are those that aren't keen on such badge sponsorship but this small exposure to such a project showed me not just how much work goes into such a project but how much toing and froing happens.

As I mentioned earlier I'd done a bit of knife homework and suggested a usable combination of tools and handle design already available, plus the possible addition of new tools (tick tweezers, ferro rod and scraper) to produce a Scout specific knife design, not unlike the branded Duke of Edinburgh ones. It was favourably received but sadly this wasn't viable as the factory producing the knives is at permanent capacity. As there are production figures available on the internet it won't be top secret to know that 120,000 units are made per day so there is no spare in the system to consider it. Shame. I had a quick tour around the shop before I headed home and it's surprising to see how much more Victorinox do other than the iconic knives.

As I mentioned earlier I'd done a bit of knife homework and suggested a usable combination of tools and handle design already available, plus the possible addition of new tools (tick tweezers, ferro rod and scraper) to produce a Scout specific knife design, not unlike the branded Duke of Edinburgh ones. It was favourably received but sadly this wasn't viable as the factory producing the knives is at permanent capacity. As there are production figures available on the internet it won't be top secret to know that 120,000 units are made per day so there is no spare in the system to consider it. Shame. I had a quick tour around the shop before I headed home and it's surprising to see how much more Victorinox do other than the iconic knives.

Rachel and I met up a week or two later in a meeting room at Gilwell to review the discussions in London and see where we were at. One thing that I'd mentioned all along was that whilst there would be uses for a pen knife within the badge, most of the knife work would really have to be done with a fixed blade. To make sure that pen knives would be a feature I devised several how to projects that could safely be done with a folder and would also be usable within the demands of the badge. I also took along a copy of the Outdoor Adventure Manual for reference, my copy of the meeting notes, my 'homework' notes and some more props.


I left them with not only some suggestions of things can could be done for most of the sections but also a list of questions about the badge where applicable. Before I went I managed to catch up with a guy called Chris James, the individual who oversaw the Outdoor Adventure Manual project. He had a spare copy of a revamped Scouting For Boys copy he let me have and I was really pleased to see that Baden-Powell's grandson had signed it inside.
 |
| The Gilwell email screen grab. |
 |
| The district email screen grab. |
In late November I had a couple of emails arrive; one from Gilwell national HQ, and one from my scouting district team informing me that that change was afoot with the badges...I internally chuckled myself a little "I already know!". This page appeared a little later in December as a teaser which announced the sponsorship deal and tells the viewer a bit about the company.

And this was a screen grab of the page pdf I was sent which was for...and now is in the February/ March 2015 Scouting magazine pullout called Get Active! I was sent it in advance to run the rule over with the three how to series appearing online. Not surprisingly Victorinox have a rather stylish full page ad in the main magazine for their Huntsman Swiss army Knife.

I got an email from Rachel in early January asking if I was free to help oversee a Gilwell photo shoot with some Scouts on a Sunday in the same month. I was and asked if I could do a Saturday overnighter with a DD tarp and hammock set up which was duly agreed. I also found out that fellow Scouter Terry Longhurst was also coming which would be useful to help ensure correct procedures and practices were followed. Terry runs Bushscout who you may have seen at anything from Gilwell 24 to The Bushcraft Show and he has also, at the time of writing, just completed the Woodland Ways Bushcraft School's two year course, the Woodland Wayer.
For those that know Gilwell I set up a small camp in the trees that have formed a sort of circle that are on the edge of the Orchard as I thought it would make a good area for photographs. Whilst there I realised that this was actually my first solo camping night so another thing ticked off the list.


As you can see I made myself at home and once set up quickly and when it came to bringing props I started out selecting stuff and then ultimately just stuffed loads of possibly usable gear ('the props') in the car. Once set up I almost inevitably got a fire going, initially to cook on and to keep the cold at bay, but we would also be needing a fire the next day for pictures. I did get through a fair bit of fuel as it was a bit nippy.


As the mobile quartermaster store (the car) needed to be close at hand due to all the kit I indulged myself food wise on the Saturday by having a sirloin steak and assorted sides. Anyone can just survive!

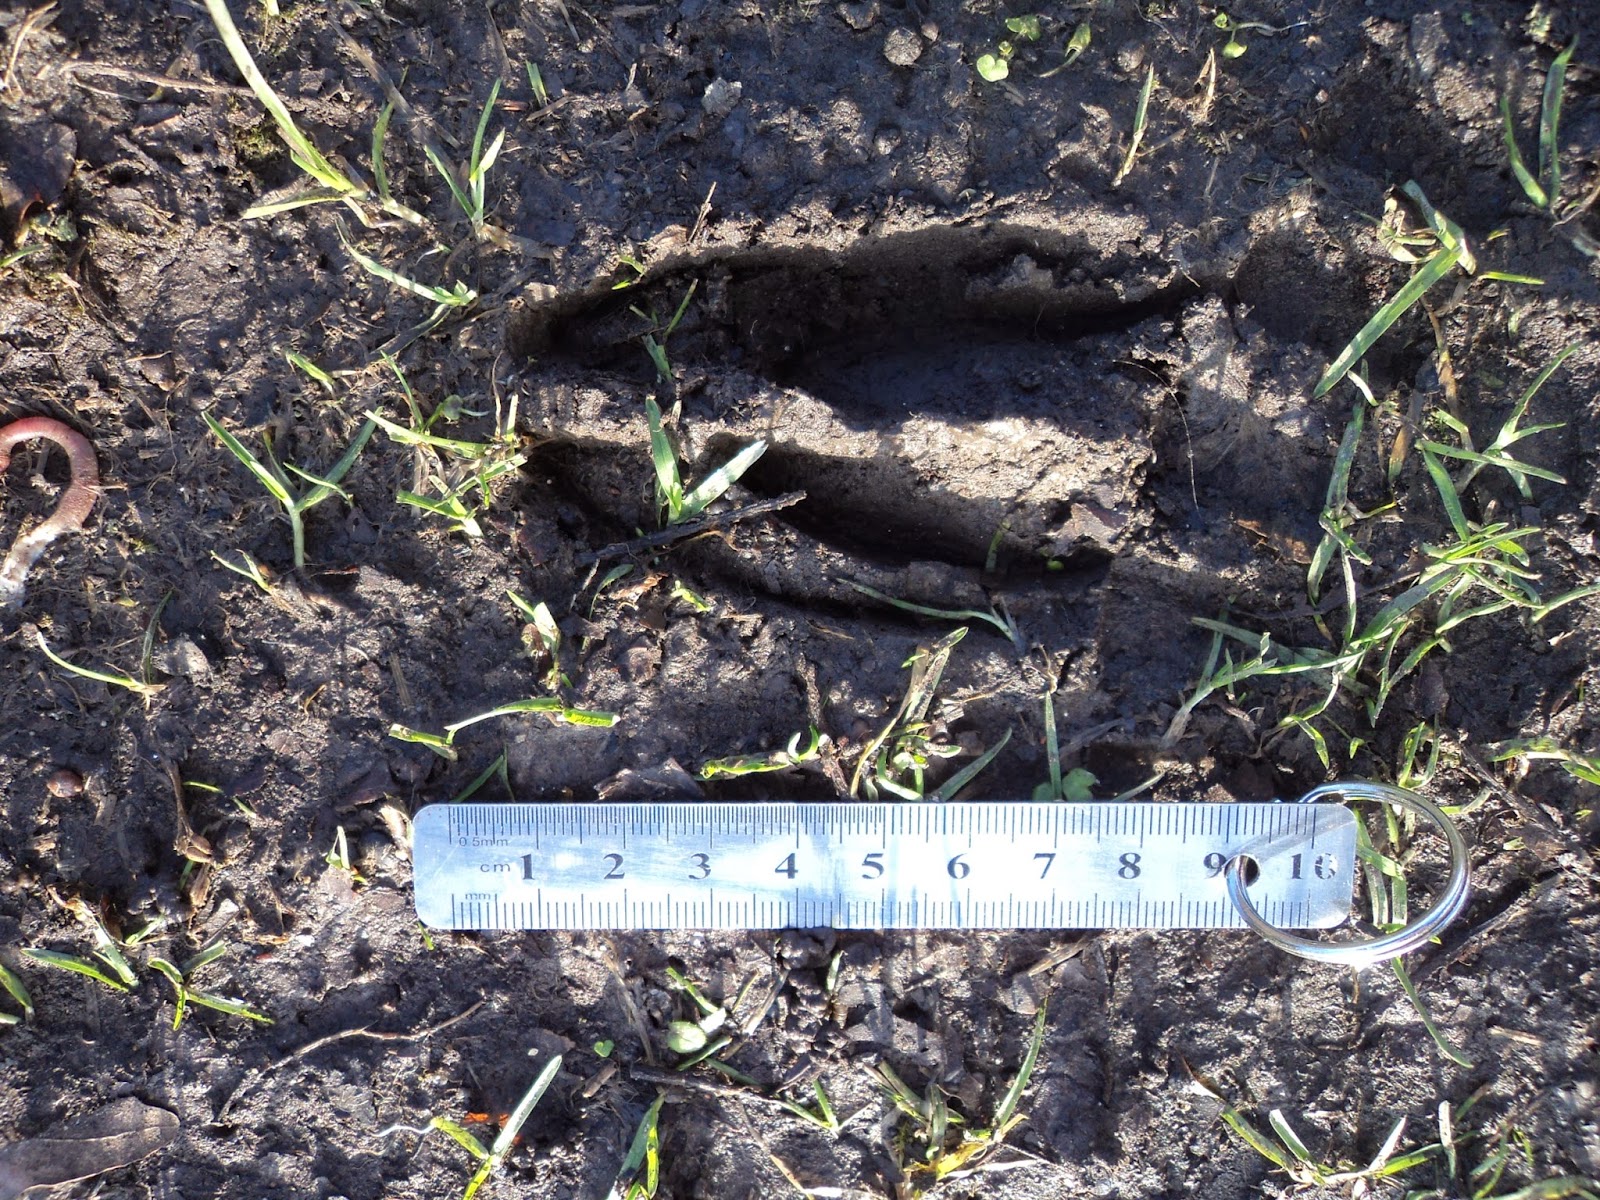
I'd set a camera trap near my camp as there was a bridge on the edge of the orchard that led to some woods and it seemed a good place to set it. I was lucky enough to capture a fox and some rabbits...the former past whilst close to my camp whilst I was cooking the steak. Terry spotted a fairly fresh set of deer tracks on the Sunday morning but it turned before it got to the trap.


Rachel kindly added me to the breakfast list in the White House at Gilwell on the Sunday morning so I rather enjoyed an early morning cooked breakfast to start the day off. It would have been nice to do myself one over the fire but it rained in the night and despite the fact that I'd turned two big logs over the fire to keep the area dry, doing breakfast was time I didn't want to use as those involved would be arriving from nine in the morning. As folk arrived an impromptu planning meeting started (including Susanne from Victorinox and Kevin Yeates who is the Scout Association's head of creative
content. The cameraman's kit was plentiful and expensive looking!


A couple of shots from the day's shoot. the Sunday weather was cloudy giving way to bright sun (I took one for the team as it rained on me in the night!). Terry and I took them through a few skills and setups before and after dinner with how to light a fire and building a tent from a tarp being two of the skills that I did. I simply used the DD tarp that I'd slept under to construct it with the Scouts (link here).

The photoshoot finished up in my camp with various impromptu shots being taken. I'd started the Sunday by cooking up a bacon and sweetcorn bannock for the Scouts and their leaders to try. I'd also pre-made a sweet sultana bannock mix for the Scouts to have their picture taken with. It was getting cold in the sun's twilight and it was only when I tried to form the dough into a bannock shape that I realised how cold as it wasn't playing ball. I got it sort of shaped but squashed a lot of the fruit in the process.
The above picture shows the bannock being cooked...Just before the Scouts then chucked a load of wood on the embers bless 'em. I kept a close eye on it and still got a win however and it disappeared as quickly as the first. You may well see shots of this bannock in future issues of Scouting magazine...


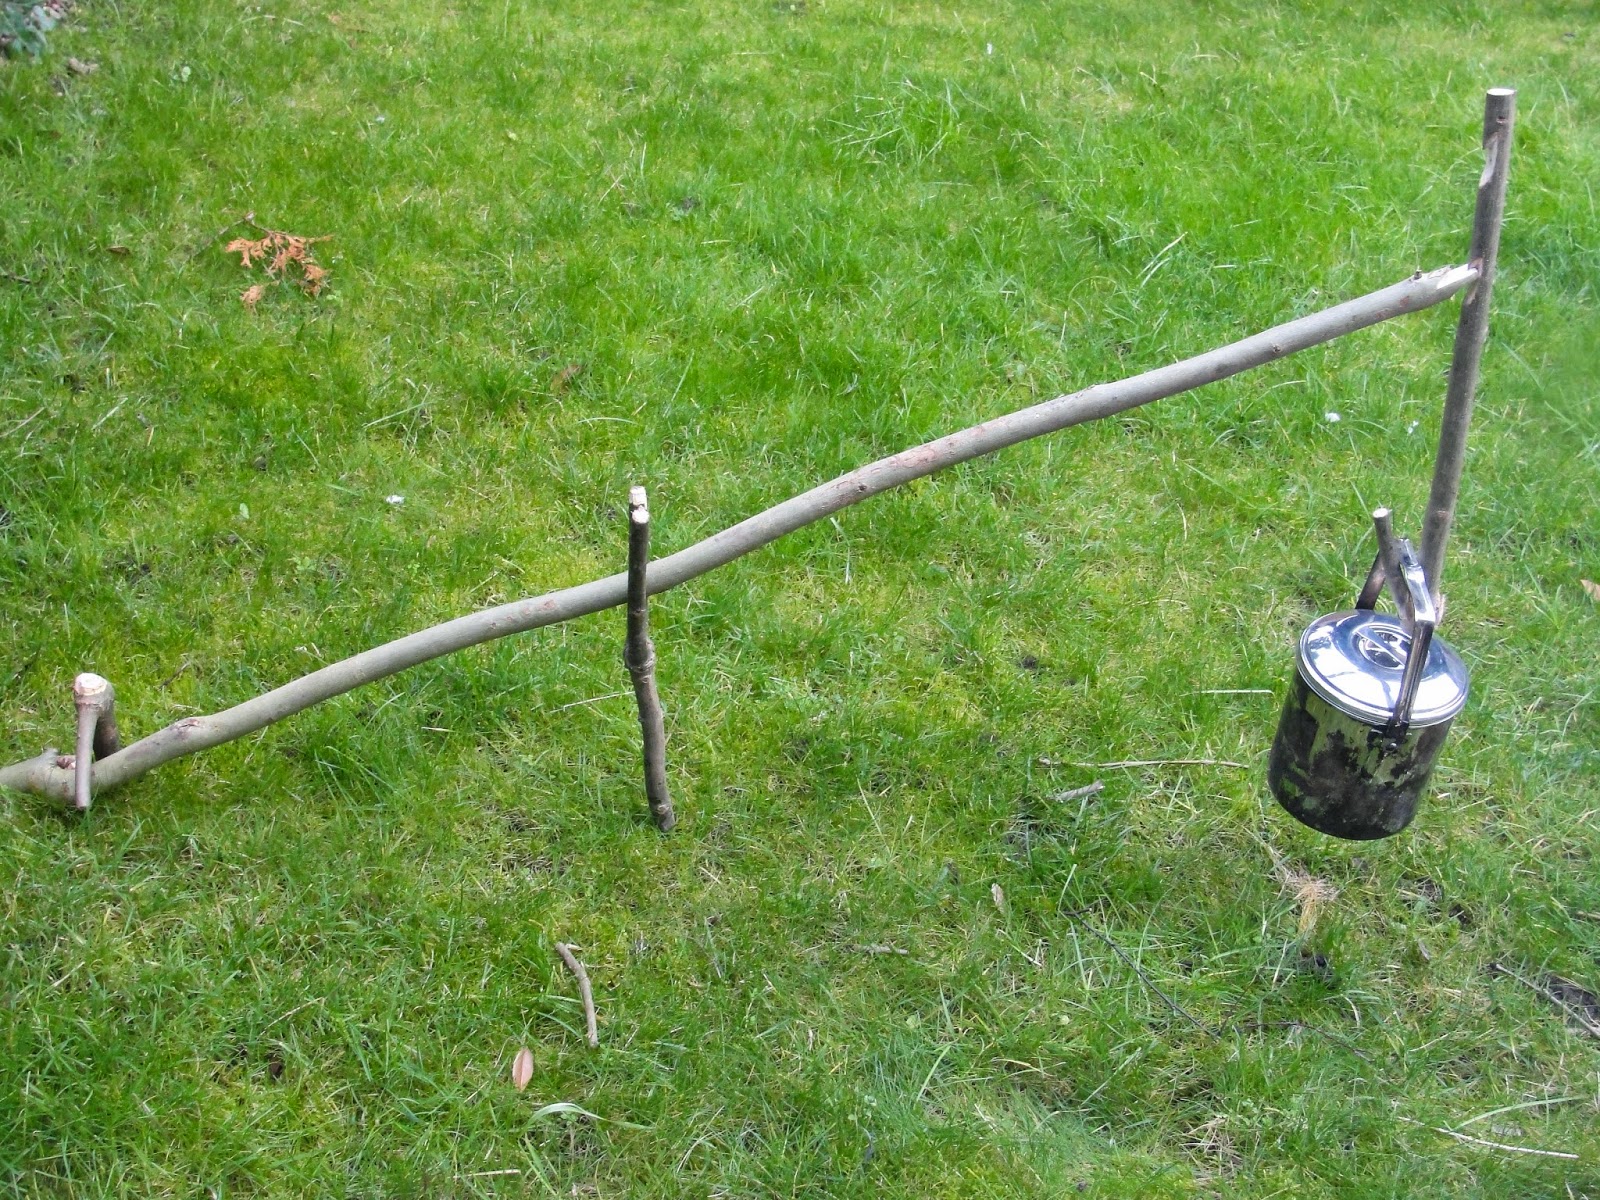
Both Terry and I had come pretty tooled up with kit just in case it was useful and I'd quickly knocked up a pot hanger set the previous Wednesday but we didn't get round to using it as a prop which is a shame because it would have worked well within the photo shoot brief. Better to have and not use that the other way around I guess...You can see the actual pot hanger hooks being utilised as a camp tidy with the aid of some paracord 550 back up the page. Apparently the UK scarf I'm wearing is the one that Kate Middleton wore in her Scouting photo shoot, I shared this fact on social media and got christened the Duchess of Gilwell. Hmmm.
We both felt that we'd not really got a lot of skills demonstrated but Rachel said the shoot was successful because you have to factor in that there are different people looking to get different things out of the day, plus the photographer will want to shoot multiple images of not only the same shot, but the same shot with different Scouts in and can only shoot one skill at a time. We've also suggested that once the 1500 pictures are whittled down (no pun intended) that Terry and I take a look to see that they are all fit for purpose.
We both felt that we'd not really got a lot of skills demonstrated but Rachel said the shoot was successful because you have to factor in that there are different people looking to get different things out of the day, plus the photographer will want to shoot multiple images of not only the same shot, but the same shot with different Scouts in and can only shoot one skill at a time. We've also suggested that once the 1500 pictures are whittled down (no pun intended) that Terry and I take a look to see that they are all fit for purpose.

And this is what all the fuss is about; a little cloth badge the size of an individual portion jam jar lid which henceforth is the Survival Skills badge sponsored by Victorinox. It's been an interesting and enjoyable journey for me because I've seen the other side of a badge sponsorship deal and not only all the work that goes into it but the different facets that go to make this a wrap. So I guess that's job done from Terry's and my point of view...Remember to look out for Terry's Bushscout stand at a show near you!
Here is the first of the sheets that Terry and I have helped with, along with additional text by Pablo, and words and text by Paul Kirtley. The others can be found here.
Here is the first of the sheets that Terry and I have helped with, along with additional text by Pablo, and words and text by Paul Kirtley. The others can be found here.
 |
| The old and new badge requirements. |